Graphic Kit Vinyl Wrap Decals Sticker 2008 2012 Ski Doo XP For Sale
When you click on links to various merchants on this site and make a purchase, this can result in this site earning a commission. Affiliate programs and affiliations include, but are not limited to, the eBay Partner Network.
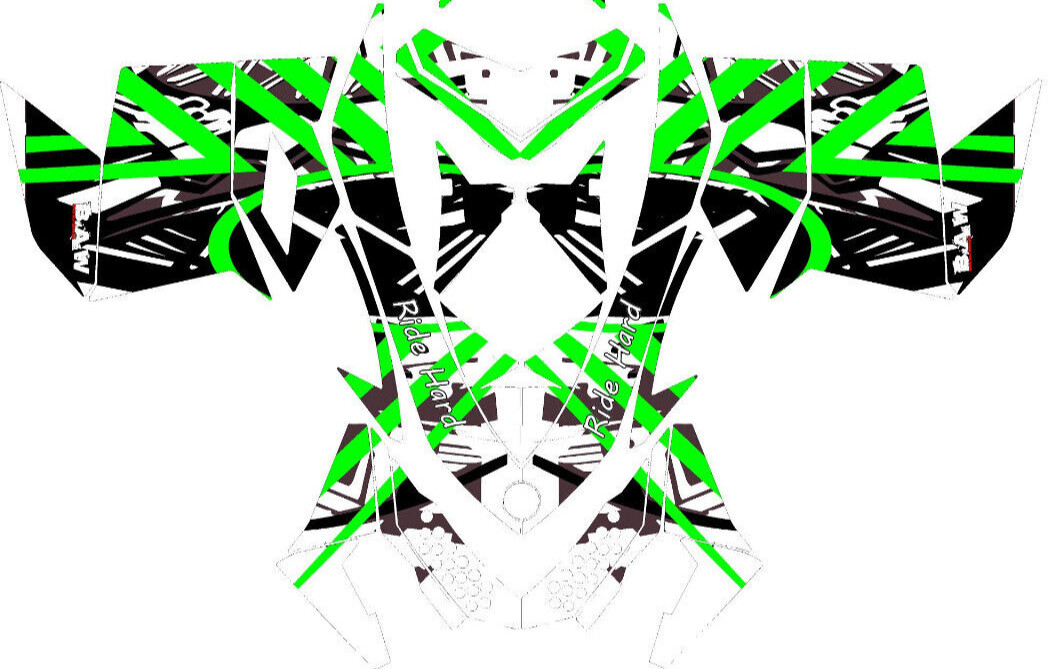
Graphic Kit Vinyl Wrap Decals Sticker 2008 2012 Ski Doo XP
Click HERE for more information about this vehicle.

This is for a 2008 to 2012 Ski Doo XP
Built to conquer:
- High-quality printing on laminated vinyl ensures vibrant colors and durability.
- High Tech Glue guarantees a tight bond that withstands even the gnarliest jumps and bumps.
- Conquer any terrain with confidence, knowing your graphic kit is built to last.
More than just looks:
- This isn\'t just a visual upgrade, it\'s a statement. Express yourself and stand out from the crowd.
- Design your dream sled and hit the slopes with swagger. Don\'t blend in, stand out!
Order now and ship in 5 and made graphic kits
From snow-shredding snowmobiles to dune-conquering Side-By-Sides, we craft custom wraps that fuel your adventures.Ability to create custom designs if we don\'t have a pre-made one you payments due immediately after auction ends or if buy now is charges listed in auctionIncludes cost of postage, packaging, and handlingInternational shipping may have additional feesDispatch within 3-5 business daysDelivery in 3-5 days, allow up to 7 for delaysReturns & Exchanges:
We want you to love your new graphic kit! If for any reason you\'re not completely satisfied, here\'s our hassle-free return and exchange policy:
Returns (Unopened Items):
- You can return any unopened graphic kit within 30 days of purchase for a full refund.
- Please ensure the original packaging is intact and undamaged.
- Note: Shipping costs for returned items are the responsibility of the customer.
Exchanges (Opened Items):
- If you\'d like to exchange your opened graphic kit for a different design or size, you can do so within 30 days of purchase.
- Please note that opened kits with any used or applied components are not eligible for a refund, OR EXCHANGE
- You will be responsible for the shipping cost of the returned kit and any additional shipping costs for the replacement kit.
If your graphic kit arrives damaged during shipping, please don\'t worry! We\'ll gladly send you replacement parts for the damaged pieces.Simply contact us within 3 days of receiving your kit with photos of the damage, and we\'ll get you back on track in no time.- Please include a copy of your purchase receipt with all returns and exchanges.
- Refunds will be processed to the original payment method used for the purchase.
We hope this clarifies our return and exchange policy! If you have any questions, please don\'t hesitate to contact us.
This graphics kit includes stickers for: what is shown in the listing you get one so let us know what color you want or we send red and white
Returns
Any items being returned must be returned in the condition they were received.Returns are processed within 1-4 business days upon return delivery date. Refunds are less the cost of the originally purchased shipping. Any item that is returned after 30 days will reserve the right to a 20% restocking fee applied.
Please note that orders with customized printing are not subject to return unless an error has been carried out by ourselves, due to the order being print
// INSTALLATION
If you choose to install these graphics yourself, you do so at your own risk. This is how I install graphics and I have found it to be the best way — follow each step carefully. Surface preparation is the most important part of the entire job.
1. Deep clean with Simple Green. Scrub every panel the graphic will touch — every crack, edge, and seam. If the machine came from the dealership with Armor All on it, or Armor All, tire shine, wax, or silicone dressing was ever used, clean it especially well. Use a toothbrush with Simple Green to get into tight spots and textured grooves. Rinse extremely well with clean water and let the plastic dry completely.
2. Old adhesive? Remove it with an adhesive remover, then wash that area again with Simple Green and rinse thoroughly. Leftover remover residue will eat away at the new graphic’s glue.
3. Right before installing, wipe the surface with isopropyl alcohol on a lint-free cloth. After this wipe, do not touch the plastic with bare hands — skin oils will contaminate it.
4. Hard or heavily textured plastic: install DRY — no water or spray. Smooth, soft, or flat plastic: lightly mist a 50/50 mix of isopropyl alcohol and water onto the surface AND onto the back of the graphic, then slide it into position.
5. Squeegee from the center outward with firm, overlapping strokes using a rubber squeegee. On textured plastic, work the vinyl until you can almost see the texture pattern through the graphic — that means the adhesive is seated in the valleys, not bridged over the tops.
6. Warm gently with a heat gun (keep it moving, never park it in one spot) to help the vinyl conform around curves, then press all edges down firmly.
7. You can set the machine in the sun briefly to help everything set — but watch it and don’t leave it baking. Too much heat will make the vinyl curl up.
8. Let the graphics cure 24–48 hours before riding, washing, or pressure washing. When pressure washing later, keep the nozzle back from the graphic edges.


